This chapter contains the following topics:
The Statement Reconciliation Process
The reconciliation process is the process of making the bank statement match your checkbook (or vice versa). To perform this process, use the Reconcile bank statements selection to bring together the checkbook and bank statement information and either ensure that they match or make them match.
Use the appropriate instructions in the Setting Up for a Reconciliation chapter before you use this selection.
If you are in start-up mode per C/R Control information, you cannot run this selection. To change from start-up mode to regular use mode, refer to the Starting Up a Checkbook chapter.
Select
Reconcile bank statements from the C/R menu.
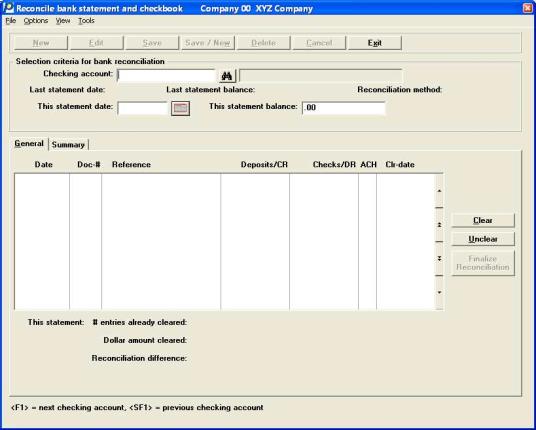
Graphical Mode
The following screen displays:
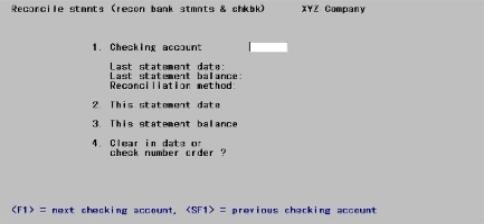
Character Mode
In character mode, the following screen displays:
Enter the information as follows:
Options
If only one checking account is entered, that account number automatically displays. Otherwise, enter the number of the checking account, or use the option:
|
<F1> |
For the next checking account |
|
<SF1> |
For the previous checking account |
The last statement date, last statement balance, and reconciliation method display for the checking account.
|
Example |
Press <F1> |
Enter the date of the bank statement. If a reconciliation is already in progress, the date of the bank statement being reconciled is displayed and cannot be changed.
Options
You may also use the option:
|
<F4> |
To select a date using the calendar lookup in graphical mode. You may also click on the calendar button |
|
<F7> |
To allow access to the calendar lookup in character mode |
|
Format |
MMDDYY |
|
Example |
Type 41515 |
Enter the bank statement balance. If a reconciliation is already in progress, the statement balance is automatically displayed.
|
Format |
9,999,999,999.99- |
|
Example |
Type 7948.89 |
To continue in Character mode select Clear Entries in Character Mode.
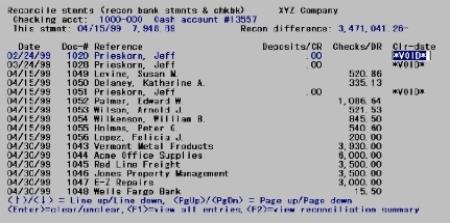
The following screen displays:
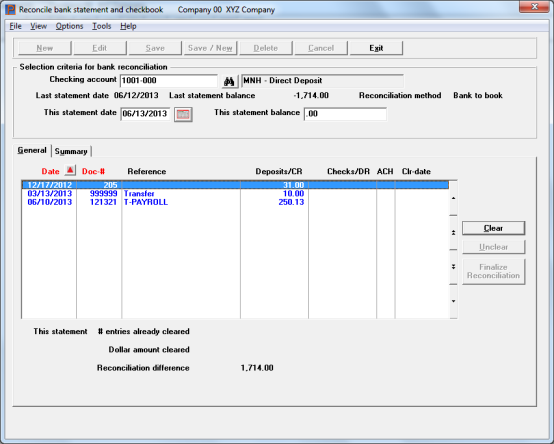
Reconcile Bank Statement List Box
The list box displays up to 16 documents at a time. You may sort the documents by date or document number both in ascending or descending order. To select a field or change the sort order, click on the column name or the arrow to the right of the column name or use the View options. Only column names in red may be sorted.
To locate a document, start typing a date or document number, depending on which sort method is selected. You may also use the up/down arrows, Page up, Page down, Home and End keys to locate a checking account. The <F1> and <SF1> keys work like the arrow keys.
Options
From the Options menu there are three choices:
|
View current entries |
This is the default. Only cleared entries that match the statement date and uncleared entries display. |
|
View all entries |
This shows all previously cleared entries, current cleared entries, uncleared entries and voids. |
If a reconciliation is already in progress, the number of cleared entries, the Dollar amount cleared, and the Reconciliation difference, all for the current reconciliation are displayed at the bottom of the tab.
Voids from Accounts Payable and Payroll
Void records get generated when checks are not printed okay using Payables (Enter) immediate checks and Print checks and post. If you indicate that the checks did not print okay a void transaction with a zero amount is created and put into the checkbook.
For voids entered using Void checks (Enter) the original check will be transferred to the C/R Checkbook. When this is the case, after posting a void it reverses the original entry in the C/R checkbook.
In the screen shot below there is an example of each:
| • | void check 1003 created during Print checks and post. The amount for this void is zero so it does not display an amount |
| • | check 1006 has been reversed by voiding using Void checks (Enter) and (Post). The original check is the debit where the voided amount is the credit |

Voids reversed using the Payroll Void checks (Post) are similar with the original check as the debit and the voided check amount as a credit. Zero amount voids generated when posting a Payroll check run are not transferred. You may enter them manually using the Load checkbook utility.
If an entry has been cleared, a date will display in the Clr-date (clear date) column. To unclear it, press <Enter> or click on the Unclear button and the date will be cleared from the screen.
To clear an entry, press <Enter> or select the Clear button. The statement date (above) will display for the clear date.
|
Example |
Use <Up> and <Down> and <Enter> to clear the document numbers. |
Stop-payments may exist with an amount. Before a stop-payment check can be cleared, using Load checkbook, its status must be changed to uncleared in Load checkbook. You may also change it to a void and enter the amount as zero.
A balance forward entry cannot be uncleared.
Reconciliation difference
The reconciliation difference is the difference between the current and last bank statement balances, minus the dollar amount cleared. As you clear and unclear entries, the reconciliation difference is recalculated and displayed at the bottom of the General tab.
The reconciliation difference will equal zero when the bank statement is fully reconciled.
When you are through clearing and unclearing entries, either press <Esc> to end without completing the reconciliation, or select the Summary tab to view the reconciliation summary.
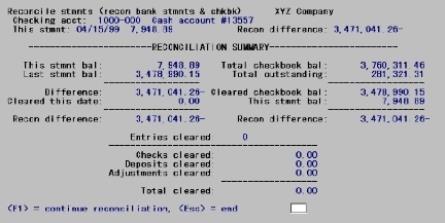
The summary tab displays as follows if the reconciliation method for this account is book-to-bank (the checkbook is being brought into agreement with the bank statement).
The following screen displays:
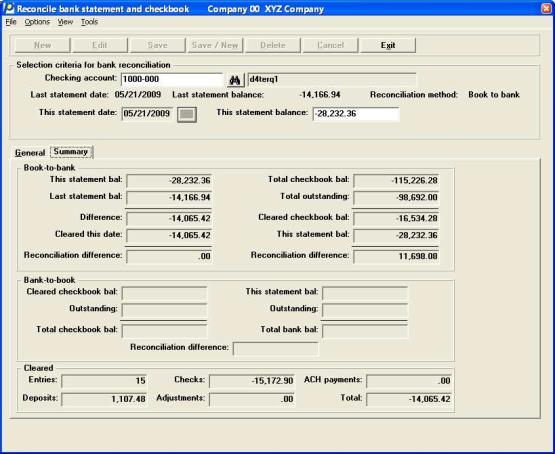
Here is an explanation of some of the Book-to-bank fields on the right column:
|
Field |
Description |
|---|---|
|
Total checkbook bal: |
This amount is the everything in the account as of today’s date; not the statement date. It includes records AFTER This statement date. |
|
Total outstanding: |
This is the total uncleared records amount as of today’s date. |
|
Cleared checkbook bal: |
This is the Total checkbook bal minus Total outstanding. |
|
This statement bal: |
This is the balance for this statement. |
|
Reconciliation difference: |
This is Cleared checkbook bal minus This statement bal. |
You must be on the General tab to finalize the reconciliation. Also, the Reconciliation difference field must be .00. Then may select the Finalize Reconciliation button for the last step. When you do you will see a message like this:

To clear the entries in character mode follow these instructions:
4. Clear in date or check number order ?
You may enter D to clear by date order or C to clear by check number order.
In character mode, the following screen displays:
If a reconciliation is already in progress the dollar amount cleared and the reconciliation difference, all for the current reconciliation, are displayed at the top of the screen.
On this screen, you can mark entries as cleared or not cleared.
All entries for the checking account are displayed that either have not yet been cleared or have a clear date equal to This statement date (above).
Move to the next group of entries by pressing <PgDn>.
Move to the previous group entries by pressing <PgUp>.
Before a stop-payment check can be cleared, its status must be changed to uncleared in Load checkbook.
A void check cannot be uncleared. A balance forward entry cannot be uncleared.
Press <F1> to show only current entries for this checking account. Press <F1> again to go back to showing all entries for this checking account, no matter what their clear dates.
The reconciliation difference is the difference between the current and last bank statement balances, minus the dollar amount cleared. The Recon difference field will equal zero when the bank statement is fully reconciled.
In order to complete a reconciliation, the summary screen must display first. The summary screen looks like this:
If the reconciliation method is bank-to-book, the bank statement is being brought into agreement with the checkbook.
In this case, also press <F1> to continue clearing entries.
If the reconciliation difference is not zero, press <Esc> to end off. If the reconciliation difference is zero (and at least one entry has been cleared), press <Esc> to complete the reconciliation.
|
Example |
Press <Esc>, then type Y twice. |